Showing posts with label halloween. Show all posts

November 2, 2017

Halloween Hair...... Boo!

Halloween fell on a working week day for me this year so the morning was a busy one getting school lunches and uniforms sorted as well as myself looking half human for a day of work. Then Little Miss Giggleberry asked me, “what Halloween hairstyle are we going to do this year?” - eeeek! I hadn’t even thought about it to be honest!
A quick think and dig through my sewing room and I came up with a ghost idea...... (similar to a Christmas tree hairstyle we did a few years ago for the festive season).
A half up half down pony tail then two braids down the sides of Little Miss Giggleberry’s hair to start. Then I thread some white silky ribbon between and through the braids to make a triangle type shape on the back of her head. I just used a Bobbie pin at the beginning and end of the ribbon to tuck them out of sight. Then I used a little dab of hot glue to attach two large googled eyes to the ribbon and finished it off with a orange Halloween bow that we have had for a few years! Done!!


Giggles

October 27, 2016

Ghostbusters Proton Pack DIY

Yes, yes, yes. It has been over 2 years since my last post. I can bore you with all the "I've been really busy" excuses or I can just get on an get blogging again.
Its Halloween in 4 days! Yay!
The Jnr Giggleberrys decided just last Saturday that they would like to dress as the Ghostbusters for Trick or Treating. They asked two of their cousins to join us to make the awesome foursome complete and got a big fat YES in reply. So decision was made now over to me apparently to make that all come together!!
I work Monday, Tuesday, Wednesday so haven't had a chance to do much more about the costumes besides a bit of Pinterest hunting until today. Today was the day I got stuck into it.... Starting with the Proton Packs!! You know, those backpack things the ghostbusters all carry to blast/suck up/kill/collect ghosts with?
To make four of them on the cheap took a bit of out of the square thinking but I got there.
I started with 4 empty cardboard boxes. These were all different shapes and sizes but I figure so are the kids so go with it! I then poked black elastic though one side of the box to create backpack 'straps' for the kids arms and taped the boxes shut.

Next up - raid your recycling bin!! Go nuts! Look for smaller containers, yoghurt tubs, bottle lids etc etc. I then rifled through the 'everything draw' in our kitchen. You know the one that has everything in it and is a complete mess?(or is that just my household) in that bottomless pit draw I found bolts, plastic thinga-ma-jiggys and an old spiral bound note book that I stole the spiral from!

Now arrange the bits and pieces on your box until you are happy with the layout then hot glue it all down. I had to make four so tried to make them as similar to each other as possible with the bits and bobs I had gathered.
This is when I decided to add the tube thing on the side that will join to the 'gun' the ghostbusters hold. This was just light plastic tubing I bought from a hardware store. I guess ducting would work too.
I cut a small hole in the side of each box and poked the tubing in. I didn't bother glueing it but you could if you wanted to.

Spray paint them black. I picked Matte Black paint for this.

Then with your hot glue gun again, stick on a few coloured 'wires' I used some craft piping stuff I had lying around. I also stuck on some round red sparkle stickers to look a little like lights.....

I bought 4 super cheap guns from the $2 shop. All black ones. The shop had three of one style so I had to get a forth that is little different. No biggie. Out came the trusty hot glue gun again and I half glued, half jammed the end of the gun into the other end of the tubing until it would not budge. No real trick to this just go nuts.....
Ta Dah!! Four homemade Proton Packs - DONE!

Now I have 3 days to get four outfits made on the cheap..... but thats another blog post!
Giggles

November 1, 2012

Trick or Treat!

Halloween 2012 is now all packed away safely for another year but just ask Milla or Harris about it and they'll have you know it was LOTS of fun!
We decorated our house again this year with a few changes from last year and added a bunch of orange, grey and black bunting. The neighbours all followed suite with a few skeletons, jack-o-lanterns and witches popping up over the past few weeks on our street!


There was lots of excitement yesterday afternoon when the kids cousins, all dressed up with buckets in hand, joined us for Trick or Treating!!


Batman, a mummy, a butterfly, a princess, a witch and Darth Vader happily went from house to house knocking on spooky doors and collecting treats - our cousins who had never done this before were AMAZED at what they got!!


We handed out over 50 ghost lollipops to other trick or treaters and had people coming to our place to pose infront of and take pics of our house!! I can see Halloween getting bigger and bigger each year and we are loving it!!


Now I wonder how long we can make the treat stash last???
Giggles

October 31, 2011

Trick or Treat!

With our house all decked out for Halloween, tonight we had a steady stream of door knockers so of course Milla and Harris (who I thought wouldn't 'get it') wanted to have a turn!


At the last minute I ran around the house to find two outfits and two buckets and off the Witch and Dragon went!


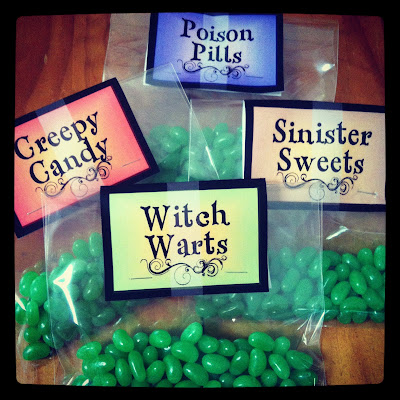
Every house in our street has some kind of decoration and everyone was handing out chocolates, candy, stickers and more!! All 45 bags of our 'Creepy Candy' were handed out to door knockers during the evening too!!


Naughty me then left two sugar filled kiddies with hubby while I dissapeared to my Monday night Boot Camp ;)
Happy Halloween!!
Giggles

October 30, 2011

Happy Halloween!

Our house is all decorated - bats, a flying witch, a HUGE spider, spiders web, my DIY wreath, a carved pumpkin we named Jacqueline and of course some Halloween Giggleberry bunting all have their spot - What do you think?


And over the weekend Milla and I put together our lollie packs for any Trick or Treaters that knock on our door tomorrow night. With THESE super cool printables from Happy Bug Digital, some bags from Pack It In and a bulk order of green jelly beans we have a selection of 'Witch Warts', 'Sinister Sweets', 'Poison Pills' & 'Creepy Candy' to hand out! Yay!


Happy Halloween xx
Giggles

October 19, 2011

Halloween Window Silhouette DIY

Bit by bit I have been adding spooky Halloween decorations to our house. Since hanging the wreath I made HERE on our front door on Oct 1st I have added a huge fairy lit spiders web, covered our front door in fake spiders web, created a HUGE plastic spider that sits on our front lawn and of course hung some Giggleberry bunting in Halloween colours in one of our front windows too... but I can't show you it all because I'm not finished yet. So I thought I'd just show you a sneak peek and how I did it.
Window silhouettes! I love the idea of these - they are super cheap and easy to make yourself but when seen at night with interior lights on behind them they look rather spooky and effective.


What You'll Need:
Black contact (I found some at my local newsagent for $3 a roll)
Scissors
Pen
Template of what silhouette you want to make (I went with bats and found templates galore with a quick search on Google Images)
Heavy object like a large book - I used these to keep the roll of contact flat while drawing my bats on it so it didn't roll up.

Grab your template - I just searched 'bat silhouette' in Google Images then choose 3 I liked, blew them up the size I wanted then cut them out. Then place your roll of black contact, unrolled on a table right side facing down, holding the corners down with your heavy objects. Go crazy tracing around your template/s - I just kept tracing my 3 different bat silhouettes until I ran out of space. Next grab your scissors and cut, cut, cut out your silhouette/s.
Now you're ready to stick! Give your window a quick clean before you start to be sure the silhouettes stick well. Then go nuts - stick away until you have the desired look... I tried to have no real pattern to my bats so they looked like they were really flying then hung the one sleeping one from part of the window frame - cool hey?


Told you they were easy to make and don't just stick with bats you can do whatever you like.... a black cat, pumpkins, snakes, rats, broom sticks or how about this one I found on Pinterest A witch stirring her poison in her cauldron!


Giggles

September 21, 2011

Halloween Wreath DIY

I am a lover of Halloween! I wish Australia embraced it more and we decorated our homes etc just like the all out awesomeness you see in the US! Hubby and I were in the States the week before Halloween in 2007 and I could have just driven around the streets all day looking at the homes covered in webs, grave yards in the front lawns, fake witches & ghosts flying over roof tops & orange pumpkins everywhere!!


Last year I carved my first pumpkin and it sat on our door step for Halloween but this year I want to do a little more to make the house look spooky fun!

With the help of trusty (and addictive) Pinterest I spotted a few wreath options but this one caught my eye the most - seriously how cute and fun is that! Originally from Better Homes and Gardens HERE this wreath is just too easy to not make one... so I did!

I made mine a little different to the Better Homes and Gardens instructions but just as easy and still as cute, I think :)


With just a wire coat hanger wrapped in two black feather boas I had the base wreath done. Then with a pack of 6 ping pong balls and some googly eyes I hot glue gunned on the eye balls (I think it could do with some more, maybe in a smaller size?) then add a orange and black ribbon bow and you're done - Easy!


My delivery guy will have a giggle when he knocks on my door in October!

Giggles

August 24, 2011

Treasury love for Giggleberry's new Ric Rac Halloween Bunting

It seems the new Ric Rac Halloween Bunting is proving to be a hit - Thanks!!

You can spot it in two current orange and black Halloween inspired etsy treasuries!

All the is Orange and Black and POLKA DOTS All Over


Halloween Hocus Pocus


Giggles

August 22, 2011

{BRAND NEW} Ric Rac Halloween Bunting!!

Just listed in Giggleberry's Etsy shop are our brand new Ric Rac Halloween Buntings!!


Hand made to order every Ric Rac Halloween Bunting is professionally finished with double sided flags sewn into quality grosgrain ric rac ribbon to add a touch of fun and spookiness to your decorating this year!
Just like the original Giggleberry bunting banners, that are loved world wide, these banners look great in so many spots. Hang your Ric Rac Halloween Bunting above the candy buffet at your Halloween party and make an impact!

Order yours now by purchasing the listing HERE to be sure you have it in time for Halloween!
Giggles