October 31, 2011

Trick or Treat!

With our house all decked out for Halloween, tonight we had a steady stream of door knockers so of course Milla and Harris (who I thought wouldn't 'get it') wanted to have a turn!


At the last minute I ran around the house to find two outfits and two buckets and off the Witch and Dragon went!


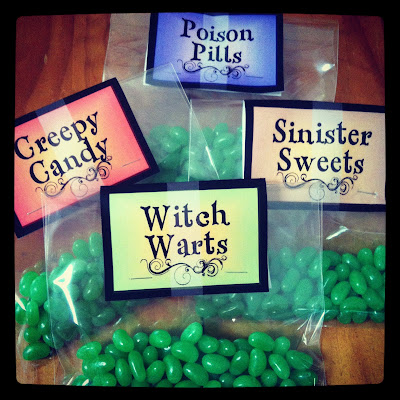
Every house in our street has some kind of decoration and everyone was handing out chocolates, candy, stickers and more!! All 45 bags of our 'Creepy Candy' were handed out to door knockers during the evening too!!


Naughty me then left two sugar filled kiddies with hubby while I dissapeared to my Monday night Boot Camp ;)
Happy Halloween!!
Giggles

October 30, 2011

Happy Halloween!

Our house is all decorated - bats, a flying witch, a HUGE spider, spiders web, my DIY wreath, a carved pumpkin we named Jacqueline and of course some Halloween Giggleberry bunting all have their spot - What do you think?


And over the weekend Milla and I put together our lollie packs for any Trick or Treaters that knock on our door tomorrow night. With THESE super cool printables from Happy Bug Digital, some bags from Pack It In and a bulk order of green jelly beans we have a selection of 'Witch Warts', 'Sinister Sweets', 'Poison Pills' & 'Creepy Candy' to hand out! Yay!


Happy Halloween xx
Giggles

October 28, 2011

Happy Friday Find

Is this not the snazziest little coin purse you've ever seen?!? I LOVE it!!


Handmade by Seventh Sphere this Bunting Coin Purse cutie could be used for so many things but having it in my handbag to hold on to all my loose coins would be fabulous!!

Happy Friday xx
Giggles

October 26, 2011

Butterfly Party - Invitation: Part 2!

Step 1 of the invitations for Milla's Butterfly Party posted HERE was lots of fun and super easy so now to tell you about step 2 of the process... getting that photo and the party info to come together!!

I like the idea of having a little fun with the words on an invitation, it's a great way to get the guests in the mood for the day. So while blow drying my hair one morning (that's when I seem to come up with all my ideas) I played around with some butterfly words and the party details and came up with the following for the invitation....

My oh my,
we'd love you to flutter on by.
To celebrate with the little caterpillar,
who is now 4 year old butterfly Milla!

Join us for afternoon tea on
Saturday 3rd Dec at the butterfly nest
address
From 1:30 - 3:30 for fluttering butterfly fun!


I know, I know, total win with Milla rhyming with Caterpillar!!

So then off to Etsy I went on the hunt for someone, much better with graphic design than me, to turn all these bits into a pretty invite. I fell in love with THESE Butterfly Number invitations from Luna Petunia Designs and grabbed them right away. Denise, who is the clever one behind Luna Petunia Designs, was absolutely wonderful with the designing - I just emailed her the photo and the wording, told her our colour theme and away she went - I'm thrilled with the result and Milla thinks they are rather fabulous too - what do you think??


Giggles

October 21, 2011

Happy Friday Find

It's been a week of firsts in the Giggleberry household this week. My little guy has started toilet training now that the warmer weather is here and my little girl started preschool today!! It all makes me wonder where the time is disappearing to and how quickly my babies are growing! Which inspired todays bunting themed find...


A handmade bunting fabric growth chart by Bo Peep Baby on Etsy. With one of these you could actually see just how much your babies do grow in such a short time!!

Happy Friday xx
Giggles

October 20, 2011

Butterfly Party - Invitation: Part 1!

Now before we go too much further into party plans for Milla's 4th Butterfly Birthday we need to think about invitations of course.

I wanted something fun & simple but something that passes on the butterfly feel to guests and most importantly an invitation that Milla can help me create - thinking caps were on!! Then I saw a THIS via Pinterest (seriously, I LOVE Pinterest) and just knew we would be able to do our version of the fun photo then turn it into an invitation somehow.

So with 2 packs of sidewalk chalk (the thick stuff not the regular thin chalk that breaks every time you try to use it) and a patch of concrete, Milla and I got to drawing HUGE butterfly wings together. We didn't worry too much about making them perfect we just had fun and made them a good size so once Milla was lying down between them they looked in proportion.


Then with me standing on a chair so I could get all of the newly coloured wings and Milla in the photo I just snapped away while Milla had a giggle - so much fun!! These are just some of the pics I managed to get... And of course Harris wanted a turn too.


I think this is the one that we'll go with for the invitation... I'll show you it once it's all finished ;)
Giggles

October 19, 2011

Halloween Window Silhouette DIY

Bit by bit I have been adding spooky Halloween decorations to our house. Since hanging the wreath I made HERE on our front door on Oct 1st I have added a huge fairy lit spiders web, covered our front door in fake spiders web, created a HUGE plastic spider that sits on our front lawn and of course hung some Giggleberry bunting in Halloween colours in one of our front windows too... but I can't show you it all because I'm not finished yet. So I thought I'd just show you a sneak peek and how I did it.
Window silhouettes! I love the idea of these - they are super cheap and easy to make yourself but when seen at night with interior lights on behind them they look rather spooky and effective.


What You'll Need:
Black contact (I found some at my local newsagent for $3 a roll)
Scissors
Pen
Template of what silhouette you want to make (I went with bats and found templates galore with a quick search on Google Images)
Heavy object like a large book - I used these to keep the roll of contact flat while drawing my bats on it so it didn't roll up.

Grab your template - I just searched 'bat silhouette' in Google Images then choose 3 I liked, blew them up the size I wanted then cut them out. Then place your roll of black contact, unrolled on a table right side facing down, holding the corners down with your heavy objects. Go crazy tracing around your template/s - I just kept tracing my 3 different bat silhouettes until I ran out of space. Next grab your scissors and cut, cut, cut out your silhouette/s.
Now you're ready to stick! Give your window a quick clean before you start to be sure the silhouettes stick well. Then go nuts - stick away until you have the desired look... I tried to have no real pattern to my bats so they looked like they were really flying then hung the one sleeping one from part of the window frame - cool hey?


Told you they were easy to make and don't just stick with bats you can do whatever you like.... a black cat, pumpkins, snakes, rats, broom sticks or how about this one I found on Pinterest A witch stirring her poison in her cauldron!


Giggles

October 14, 2011

Happy Friday Find

It's a drizzly overcast Friday here. The perfect weather for reading books, making forts under the dinning table, wearing fluffy socks and sipping hot chocolate!


This is my hot chocolate mug choice - Bunting Mug by Tea & Ceremony on etsy.

Happy Friday x
Giggles

October 13, 2011

Butterfly Party - Paper Butterfly Garlands!

Butterflies are floating through my mind permanently at the moment with Milla's butterfly themed 4th birthday next month so I have started to make some decorations - Yay!

I bought this gorgeous Martha Stewart butterfly craft punch on eBay


and some scrap booking paper in the colour palette of the party


then, with Milla's help we 'punched' butterflies until we ran out of the paper.


I mixed them with THESE cuties I bought from One Crafty Mumma & have started to make paper butterfly garlands.
They are so simple to make - just run a little cotton through your sewing machine first (so you have something to tie them to where they'll hang from with) then feed the butterflies through like you would fabric. I did them in no order or pattern and did some doubled up so I can then fold the wings away from each other to make them look as though they are flapping.


Excuse the terrible dark sewing room photo but I'm rather pleased so far, what do you think? I have more to make and plan to hang them everywhere on the party day to mimic butterflies fluttering around our yard.
Giggles

October 11, 2011

Custom order for Etsy!

Last week I was contacted through my Etsy store by Kristeene.
Kristeen is the Community Manager for Etsy Australia, spreading the good word about Etsy and all things handmade around Oz and asked if I could help.

After a little chat we had a plan. Etsy orange flags with white letters - Ta Dah


Go Etsy!


Go Etsy AU!!


Giggles

October 7, 2011

Gluten Free version of the KitKat & Smartie Cake

Felicity, my step daughter is turning 11 this Sunday (goodness where did those 11 years go?) so to celebrate we had a little get together with family for a BBQ dinner last night. Nothing fancy, just a good excuse to blow up some balloons, make some paper chains (a great way to use up the growing pile of kids artworks) and of course eat cake!

Felicity is on a strict gluten free diet so when choosing her birthday cake each year it's tricky to find something yummy, fun and diet friendly. When I spotted the KitKat and Smartie cake that is doing the rounds at the moment HERE I LOVED it and had a little think about how I could do a gluten free version. Drum roll please....
Ta Dah!!


With a yummy (tried and tested) moist gluten free chocolate cake mix from Coles, some gluten free choc wafers and 2 bags of The Natural Confectionary Co. jelly beans it was looking rather swish, if I do say so myself.


Then add the gorgeous and fun paper Happy Birthday cake bunting I scored on Raspberry Lime Paperie's facebook sale recently and the masterpiece was complete!


And what a gorgeous excuse to use my pink hobnail cake stand from RubyJu for the first time!


Needless to say it was enjoyed by all!
Giggles

Happy Friday Find

Just a little sweet sugar hit on the Friday afternoon for you all - Bunting Sugar Cookies from Bubble and Sweet!


These are so cute and with Bubble and Sweet's simple instructions HERE are rather simple to put together too... and if you change the flags to whatever colour scheme you next party is they'll match perfectly!
Happy Friday xx
Giggles

October 6, 2011

Butterfly Party Plans... the beginning!

Hooray for party planning - you all know I LOVE it!!
The birthday season for our family is rolling around again and with my kids getting a bit older I have been pushed out of the decision role for choosing a theme... This year Milla asked for a butterfly party for her 4th birthday (my little party planner informed me of this months ago) So here we go, this is the first of my butterfly party planning posts! Yay!
With the theme under control where to next? The colour scheme.
I find it really easy to find a theme then a colour combo to base everything from when planning. After a little hunting around for some fun butterfly fabric we (I say 'we' because I am determined to let Milla be in on all the planning and creating bits and pieces) settled on this ' Sacha in Pink' by Kumari Garden


Cute hey? a bunch of summery bright colours - red, pinks, orange, lime green, yellow - perfect for a November party!
I have bought a bunch of this fabric and some of it's coordinating fabrics and will turn it into a table cloth/runner, some bunting (of course) and other ides I have brewing away ;)

Speaking of ideas, these are just some of the inspiration I have found online while searching.... this is going to be fun!!


Any other butterfly ideas I should know about?? I'd love to see
Giggles

October 2, 2011

It's My Birthday chair cover!

Next weekend my step daughter, Felicity, is celebrating her 11th birthday. Mix that with today being a quiet rainy day so kiddies are snoozing away and I had the perfect mix of excuses to finally get around to THIS tutorial I found on Nanny Goat blog aaaaaages ago for a 'My Special Day Chair Cover'


It was really simple with the instructions and photos to follow and I had mine whipped up in 20ish minutes!


Using fabric, ribbon and ric rac and velcro I had in my stash I just changed the words on mine to 'It's My Birthday' and it's all ready for the dining chair of whomever in the family has a birthday to make their day a little more fabulous and fun!


I have to wait until April next year before I get a turn of it!! LOL
Giggles