Showing posts with label cake. Show all posts

December 2, 2016

Irish Dancer Cookies and Surprise Cake

Little Miss Giggleberry turned 9 (yes NINE!!) on Tuesday. Birthdays are always fun and we make a big deal out of them in the Giggleberry household. There is always lots of anticipation and excitement leading up to the day. This year Little Miss Giggleberry didn't have a party so there was no real 'theme' to her birthday. I had her permission to choose what style cake and goodies I would make to share with her schoolmates.
I little ponder a few weeks back and I realised her birthday actually fell on a dance practice day as well as a few of her gifts were Irish dance themed so an Irish Dance theme was picked and I straight away ordered a cookie cutter from Irish Dance Diva that is the shape of a solo dress ready for a baking marathon.


I started with the cookies (mainly because these can be made way ahead of time and frozen). I made 67 cookies!!! As half were to go to school and half were to be shared with Little Miss Giggleberry's dance buddies.
Once the cookies were cut, baked and cooled. I packaged them up and froze them for 24 hrs. It makes decorating them allot easier as they aren't so delicate. Working with 5-10 at a time I rolled out fondant, in the three colours requested by the birthday girl, and attached it to the cookies with a little sugar water. I then had lots of fun imprinting patterns and cachous onto the little dresses for some fun detail. This was my first time playing with fondant on cookies but I was pleased with the result and will absolutely be using it again.


Little Miss Giggleberry was thrilled to take these to school and dancing class to share with all her special friends.

Then onto the cake! I kept this a surprise, for a few reasons. 1) Surprises are fun. 2) The inside of the cake being a surprise would be ruined if she knew before hand and 3) If I completely stuffed it up she would never know any different!
With a basic butter cake mixture all prepared and divided into three. I used the three colours the birthday girl had chosen for her cookies and coloured it. Then one heaped spoonful at a time I scooped it into the prepared loaf tin and baked it as per usual.


Once it was baked and 100% cooled I sliced it up like a loaf of bread then froze the pieces in a sealed container overnight.


The next day I prepared another butter cake mix then set it aside for a moment while I prepare the already sliced cake. While the slices are still frozen cut out the shape (you can honestly use whatever cookie cutter shape you want - think Christmas tree for the festive season, pumpkin for Halloween, blue or pink star or heart for baby gender reveal. the possibilities are endless) from each slice and discard the off cuts. The below photo is of the 'dress slices' all stacked up on each other.


Alrighty, now grab the greased and floured cake tin and scoop in about 1/3 of the butter cake mixture and smooth out. Then one by one place the cut out shapes into the mixture so they are standing up in a row touching one another.


Gently cover the shapes with the rest of the butter cake mixture and tap the tin lightly to try to remove any air bubbles. Bake the cake as usual in the oven.
Now the trickiest thing about this cake, especially when this was the first one I had attempted, is that you kinda have no idea if it has worked until the cake is sliced! So I crossed my fingers and just kept on.
Once completely cooled I iced the cake with some white icing and a heavy sprinkling of cachous. Added some candles and crossed my fingers it had worked.

After our family dinner we sang Happy Birthday, Little Miss Giggleberry blew out the candles and I handed her the knife to slice away.....
IT WORKED!!!


I was so glad and the GASP that came from the birthday girl herself when she saw the dress inside the cake was worth all the extra fuss!!

Giggles

February 18, 2013

Chocolate Bar Chocolate 'Cake'

Is special someone having a birthday? or has an achievement/milestone been reached? or were you thinking of making/buying someone something 'just because'?
Forget baking them a cake and forget buying them a boring box of chocolates. How about you give them the best of both worlds and make a Chocolate 'Cake'....

This beauty is so simple to make but so much fun to give!!
YOU WILL NEED:
NOTE - this is for a two tiered cake. You can make it 1 teir or as many as you like you will just need to add/minus another tin and more chocolates.
2x biscuit or cake tins in two different sizes.
scissors
hot glue gun
double sided sticky tape
chocolates, chocolates and more chocolates (you just need to make sure they are at least the same height as your tins if not taller)
ribbon
Cake board or piece of sturdy cardboard
Clear cellphone
Number candles if desired

1) Hot glue the largest biscuit tin upside down to the cake board.
2) Hot glue the smaller biscuit tin upside down to the first biscuit tin.
3) Using your double sided tape start to stick your selection of chocolates around the tins. (You can do this in a pattern for symmetry or use all red chocolate bars for example to match a theme etc)
4) Tie a length of ribbon around the entire circle of chocolates tight. This will secure them much stronger than just the double sided tape alone.
5) Place the candle numbers or centrepiece of your choice to the top using the glue gun.
6) Surround the numbers with more chocolates to cover the top of the tin. These can lye there loose or can be stuck with the double sided sticky tape.
7) Wrap the whole thing in clear cellophane and tie with a bow.
8) Give this bad boy to it's recipient and get ready for a huge hug and maaaaaybe they might even share ;)

I can see one of these being a great centre piece for a dessert table, or the perfect thing to take to a girls weekend away and even a wonderful teacher gift!
Enjoy xx
Giggles

February 11, 2013

Burger Birthday Cake!

It's no secret around here that I like a good excuse to make a fun cake. So with hubby's birthday last wednesday I let the kids choose what type of cake he should have and was thrilled with their choice... a Cheeseburger Cake!!

This cake is rather simple to put together for such a funky finished product.
You will need:
1 round butter cake
1 brownie mixture made into one large round brownie (NOTE use the same round tin as you did for the butter cake)
1 packet of Jolly Rancher lollies (you need the red and green ones)
1 packet of Starburst Fruit Chews (you need the yellow ones)
Pine nuts
Butter icing coloured light brown (mix red and blue colouring until desired colour is achevied OR use a tiny amount of Wiltons brown gel colouring)
Slice the butter cake right through the middle with a serrated knife top create the burger buns. Place the bottom 'bun' on your cake plate with a tiny bit of icing between the cake and plate so it doesn't slip around. Place the large round brownie 'meat pattie' ontop of the bottom 'bun'. Then on goes the top of the butter cake as the top burger bun - you should now have one pretty basic looking 'burger'.
With your icing coat the top cake and try to smooth it as much as possible to look like a burger bun. Next up is the fun part - the tomato, lettuce and cheese! With the red and green Jolly Ranchers and the yellow Starburst chews you need to roll them flat with a rolling pin or squish them out with your fingers (warning this can become sticky!). Once they are rolled out flat-ish you will need to shape them a little. With the red ones make them a little round like a slice of tomato. The yellow ones can be cut into triangles to create slices of cheese and the green ones just need to be wrinkled up a bit to look like lettuce leaves. Now have fun just poking the little bits and pieces into the cake between the 'meat' and the top burger 'bun' like in my pictures.
Last, but not least, sprinkle a handful of the pine nuts ontop of the cake to create sesame seeds on your bun - simple!

Now pop it in the fridge and have a little giggle about the size of the 'Burger' next to the rest of your groceries!

This was lots of fun to make and Master Giggleberry loved helping me (and snacking on the left over Starburst chews). We poked a few sparklers in the top & sang happy birthday for hubby after dinner that night and couldn't help snapping a few fun pics after we had all had a slice.

Add this one to your cake 'To Do List' - you won't regret it... too much fun!

Giggles

February 29, 2012

Firefighter Party - Cake!

This whole Firefighter theme for Harris' party on Friday night came from Harris spotting a fire engine cake in one of my cake books so of course that will be the cake I will attempt (wish me luck).
I have found a great 'How To' video (below) on YouTube that I plan to follow and have already hit the supermarket for all the bits and pieces I need for it.... finger crossed it gets the pass mark by the kids!


I plan to present the cake on my gorgeous black cake stand I got from Tracey Lau so I thought I would tie it into the firefighter theme a little bit by adding a length of yellow and black Washi Tape I found from The Kawaii Notebook - so simple but effective, don't you think?


Two days to go...
Giggles

November 25, 2011

Happy Friday Find!

A Happy Friday Find for those of you celebrating Thanksgiving...


How seriously Ca-ute is this Bunting Turkey Cake by Dream Day Cakes spotted on Hostess With The Mostess
Happy Thanksgiving and Happy Friday xx
Giggles

November 11, 2011

Happy Friday Find

Tonight we are off to dinner with my mother in law for her birthday today - she is one one the lucky few to claim today's date 11/11/11 as her birthday! We are having a nice casual dinner at a local place with her, our family & my sister in law's family so I offered to make a cake - just something we can sing happy birthday over and have some candles to be blown out. The kids chose what cake to make from a recipe book and it's all done and ready in the fridge. Our baking session inspired today's bunting find....


This stunning Summer Bunting Wedding Cake found on Zankyou - isn't it gorgeous!!
Happy Friday xx
Giggles

October 7, 2011

Gluten Free version of the KitKat & Smartie Cake

Felicity, my step daughter is turning 11 this Sunday (goodness where did those 11 years go?) so to celebrate we had a little get together with family for a BBQ dinner last night. Nothing fancy, just a good excuse to blow up some balloons, make some paper chains (a great way to use up the growing pile of kids artworks) and of course eat cake!

Felicity is on a strict gluten free diet so when choosing her birthday cake each year it's tricky to find something yummy, fun and diet friendly. When I spotted the KitKat and Smartie cake that is doing the rounds at the moment HERE I LOVED it and had a little think about how I could do a gluten free version. Drum roll please....
Ta Dah!!


With a yummy (tried and tested) moist gluten free chocolate cake mix from Coles, some gluten free choc wafers and 2 bags of The Natural Confectionary Co. jelly beans it was looking rather swish, if I do say so myself.


Then add the gorgeous and fun paper Happy Birthday cake bunting I scored on Raspberry Lime Paperie's facebook sale recently and the masterpiece was complete!


And what a gorgeous excuse to use my pink hobnail cake stand from RubyJu for the first time!


Needless to say it was enjoyed by all!
Giggles

November 11, 2010

Rainbow of Ribbons - birthday cake!

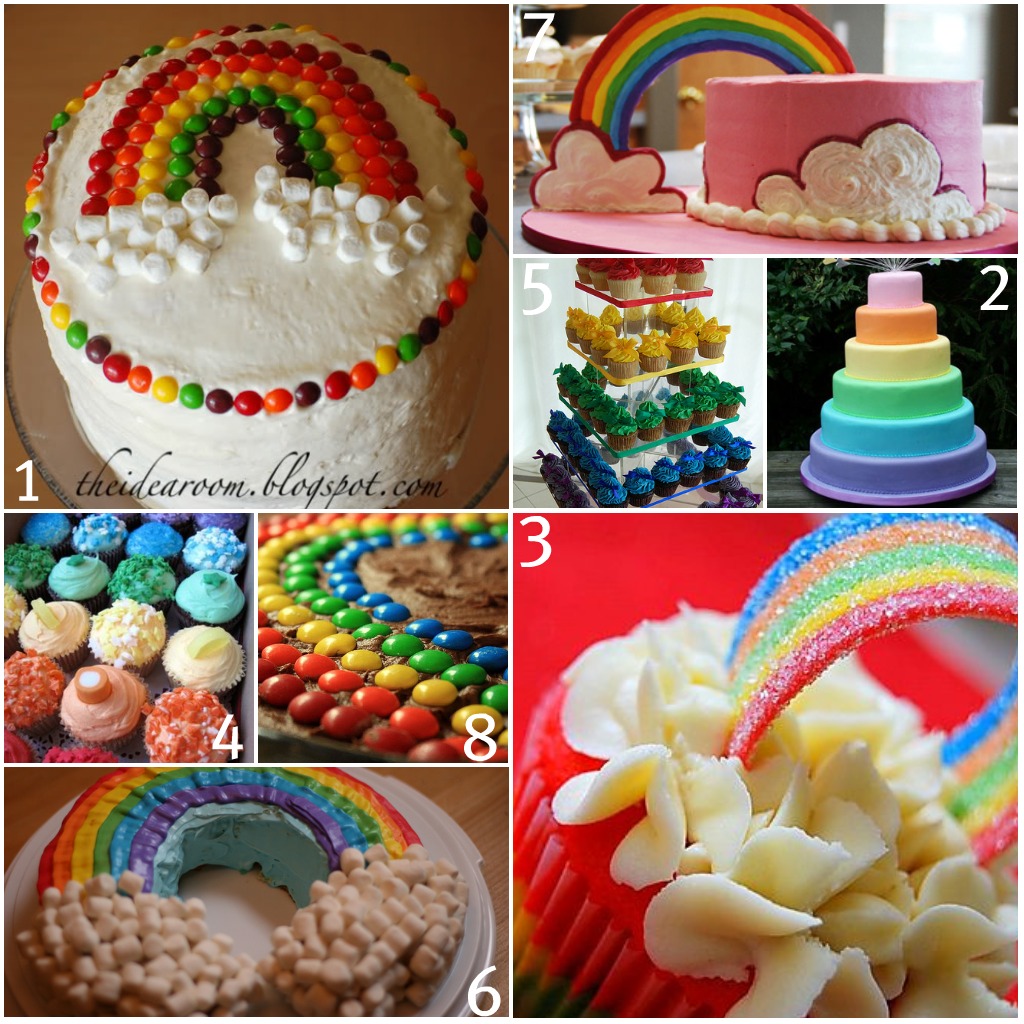
99% of you who know I am planning a Rainbow of Ribbons party would be forgiven for assuming that of course the cake will be one of those AMAZING rainbow layer cakes that are popping up everywhere.


Truly I think these are just stunning not to mention super clever!! (the above pic is from HERE with the how to for the cake too) One day I do want to make one just to say I had but for Milla's upcoming party I can't help but want to 'be different' from most other rainbow parties so I have gone another route with the cake.
Now, I don't want to promise anything as spectacular as the famous rainbow layer cakes but I will have fun making what I have planned and am going to keep it a surprise.... only 3 wks to wait, you'll be right ;)

In the mean time I thought I'd share with you some fabulous rainbow cakes I found while searching for Milla's cake inspiration - Enjoy.


1. The idea room
2. Wedding Cake Pictures
3. Snag Wire Media
4. Crumbs and Doilies Cupcake Blog
5. Cupcakes take the cake
6. Rainbow Cake
7. Rainbow Cake
8. Rainbow Cake


Oh and check out these fabulous candles I found for Milla to blow out - PERFECTO!! I bought them from HERE


Giggles

September 29, 2009

Thanks again Donna Hay!

I had myself and my little girl in a wonderful (and tasty) sticky mess today and was so impressed with the results I thought I'd share!
It is the beginning of the birthday season for my family starting with our eldest daughter, Felicity's, 9th birthday on the 9th of October. Felicity is on a gluten free diet so finding a cake that accommodates this and still tastes good is always a mission. Thanks to good old Donna Hay I have found a fun and delicious (and soooooo easy) bake free cake! but I thought I'd better give it a 'test run' first before I make the real thing and show up at the party with a terrible mess or horrible tasting failure... well that's my excuse anyway heheheh

What you need:
8 cups large white marshmallows (or pink ones if you want the cake to be pink)
150g butter, chopped
12 cups (420g) rice bubbles

Place the marshmallows and butter in a saucepan over low heat. Stir until melted and smooth. Place the rice bubbles in a bowl, add the marshmallow mixture and mix until well combined. Using slightly damp hands, press the mixture into a greased and lined 20cm-round cake tin. Refrigerate for 1 hour, or until firm.
Turn out onto a cake stand. Use a small fluted nozzle to pipe the pink icing around the edge of the cake and decorate with candy coated chocolates and candles.

This is the gorgeous finished product as done by Donna Hay...... not sure if the cake I make will be this amazing.


The 'test run' I made today was so easy and with only 3 ingredients mixed together in a bowl I did with my 22 month old who loved every minute of it! I decided (at the last minute) to divide the mixture into cupcake wrappers to make little individual crackles for a bit of fun!


I'll post pictures of the 'real thing' as a complete cake once it's all done and report back what the response is..... if the party goers are anything like me they'll love this sweet sticky treat!


Giggle