So we are 70 sleeps away from Christmas!!!! (thanks fellow Christmas lover Dee for the count down). That means there is a pretty good chance you should be thinking about or will soon be involved in some Secret Santa gift givings. Maybe at work? or with your mothers group? or with family?
With a bit of time up your sleeve now why not take the reigns and announce that you will be the 'Secret Santa Planner' this year? (don't panic, I have the perfect idea to help you along the way). Just like me, how about you make the process of the Secret Santa a little more interactive and unique...
Surprise Secret Santa Cookie Mixture!
Just some simple ingredients, a bucket of green and red M&M's (that are now available at your local supermarket as it's so close to the festive season), some cheap glass jars from the $2 shop and the 'How To' from Bakerella HERE and I have a bunch of cookie mixture in jars ready to give out - but wait, the catch is, that INSIDE each jar, among the ingredients, is a name.
Once the jars are all handed out to each member of my Secret Santa group they must bake the cookies in order to find the name of the person they are shopping for! Fun, right? (BTW don't forget to attach the method of baking the cookies also found HERE)
This way everyone gets into the festive mood with a bit of Christmas cookie baking, find out their Secret Santa person and end up with a batch of yummy cookies!
Forget the old and boring 'draw a name out of a hat' for choosing who you will be buying for - this is lots more fun (& yummy)!
Pages
▼
October 16, 2012
October 12, 2012
Happy Friday Find!
I have a new sweet, squishy and oh so cute baby niece, Harper, who was born last Sunday. Of course I have had cuddles and kisses already and had a moment of cluckiness too.
Why is it once a new little bubby arrives you start to see so many gorgeous baby things you just want to buy...
Just like this adorable Bunting Elephant mobile by Empire Lane . It would be very lovely hanging above the change table or cot of a little person, don't you think?
Happy Friday xx
Why is it once a new little bubby arrives you start to see so many gorgeous baby things you just want to buy...
Just like this adorable Bunting Elephant mobile by Empire Lane . It would be very lovely hanging above the change table or cot of a little person, don't you think?
Happy Friday xx
October 10, 2012
Rainbow Jelly Cake!
October rolls around so fast every year. It's the month of the year which my step-daughter, Felicity, celebrates her birthday and being on a gluten and dairy free diet I spend most of September every year trying to think of a yummy, festive and diet friendly birthday cake to make. This year was no different but I scored (thanks to Pinterest yet again) when I found the idea of a jelly cake!
I needed a jelly mould (I have also seen these cakes done in a bundt tin) and found one at a local kitchenwares store for $15ish and of course jelly.... Areoplane Jelly is gluten free and is loved in our home for treats so I headed straight to the supermarket and grabbed 5 packs: red, yellow, green, blue and purple... yep, a rainbow!
You will need a day that you are at home for a while without too much distraction as it is a little time consuming but oh so worth it for the result.
With my jelly colours, in order of how I wanted the layers to be in the cake, I made up the jelly mixtures and used 150ml LESS water than the packet asks for - this will help the jelly set a little stiffer but still have a true jelly 'wobble'. It also then made up the perfect amount to have all the liquid fit into my size jelly mould.
Pour 1/2 of the first colour (red in my case) into a lightly greased jelly mould and put it in the freezer for 10-15 minutes (you can use the fridge but it will take longer to set and with so many layers to go will make it a looooong process). You want each layer to be just set but still slightly 'tacky' to touch so the next layer will 'stick' to it.
While the first layer is setting mix a small amount - approx 1 tablespoon - of greek or natural yoghurt (I used a dairy free yoghurt) into the second half of the mixture until combined. Once the first red layer was set to the consistency I needed it I GENTLY poured the red yoghurt/jelly mixture onto the first and put it back in the freezer for another 10-15 minutes.
Continue just like this for each colour until the whole rainbow is done and the jelly mould is full. Then put it in the fridge for at least 3-4 hours or overnight in my case to really set well.
15 mins before serving take it out of the fridge and leave at room temp. When you are ready to serve find a plate large enough to take the cake and place it onto of the mould then flip the whole thing (plate and jelly in the mould). You might need to give it a little gentle wriggle but it should slid straight out of the mould and onto your plate.
Pop in a few sparklers and wow your birthday girl and guests - This 'cake' was a HUGE hit here and I can see it being made many times over... maybe a different colour combo next time??
October 6, 2012
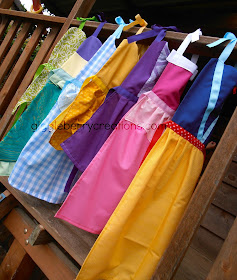
Princess Dress-Up Aprons!
Just 3 nights ago I had a wave of creativity hit me while sitting at the sewing machine and before I knew it I had a Snow White Dress-Up Apron made for Milla's dress-up box.
I thought it was so cute that I sat right back down and made another... this time Rapunzel
I called it a night and went to bed but my creativity was re-sparked when Milla's saw her new 'dresses' in the morning. She LOVED them and couldn't decide which one to wear first. So with a bit more of a dig through my fabric stash to see what I could rustle up I then made Sleeping Beauty
The Little Mermaid (she was my fav as a little girl)
Belle
And Cinderella (use you imagination for this one it was the only pale blue fabric I had in my cupboard)
I shared these as I went on my Instagram and with family and had such a great response that I have decided to make and sell them for a VERY limited time only.
They are so easy to pull on and off for kids with no full outfit change!!!
The perfect handmade Christmas gift? or a cute Halloween costume? email me now at giggleberrycreations@gmail.com to place your order now.... maybe I haven't got your fav princess made yet? email me and I can see what I can come up with :)